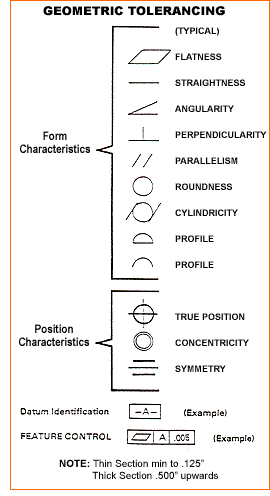
 Geometric Tolerances Geometric Tolerances
There has been a lot of discussion over the years between various suppliers
of investment castings regarding tolerance that is appropriate for the
process. While there continues to be some debate, what follows is meant
to be a general guideline. An investment casting is meant to be a "near
net-shape" part that offers the most value. If the buyer and producer
maintain a high level of communication, the design requirements and cost
efficiencies will be met by processing capabilities.
 Straightness,
Roundness, & Positioning (holes or bosses) Straightness,
Roundness, & Positioning (holes or bosses)
Axial straightness, roundness (bar or tube shapes) and positioning of holes
or bosses is generally tolerance as +/-.005 per inch.
Concentricity
The center of a bore to the outside diameter of a part will be concentric within
.003" for each 1/2" of wall thickness. Note, this assumes measurements
are taken in the same plane and does not include out of roundness tolerance.
Angularity
As is the case with other dimensional tolerances for castings, the as-cast
angle tolerance is largely a function of the part design. In general, a tolerance
of +/-1/2 degree is considered minimum.
Blind Holes and Slots
These features are generally cast provided the depth is equal to the width
or diameter for small characteristics less than 3/8". As the size increases
above 3/8", the depth can move incrementally to double the size of the
opening.
Flatness
This feature of casting is measured as the distance between two parallel planes,
within which, the entire surface of the part must lie. Once again, the actual
shape of the part will largely influence the cooling behavior of the wax
pattern and the part as it solidifies; and this, in turn, tends to govern
process capability. This requirement is frequently expressed in terms of
six (6) square inches of surface area.
| Part Thickness |
Flatness
T.I.R. |
| .000" to .500” |
.004" |
| .051" to 1.000” |
.008" |
| 1.000" to 2.000” |
.15” |
Wall Thickness
Although wall thicknesses down to .020 may be achievable in a small area,
the normal minimal wall thickness zone lies between .040 and .080 depending
upon alloy and square inches of surface area.
<Back | Top | Home
|


